What can I say? It's the summer (officially starting today) and I've been busy with everything. Here is a general update on my hobbies.
Bonsai
I never got a chance to take pictures of the fig tree all wired up. It's too bad because it was my first wiring project and I think it turned out fairly well. As of last Thursday, I removed the wire from the ficus because it had started to cut in. To explain, the tree obviously is growing the whole time the wire is in place and if left too long, the tree will start to grow around the wire and leave ugly spiral grooves along the branches. Even with my current timing, it left some evidence, but only on the underside of 1 or 2 branches. Hopefully that will grow out quickly as I think the fig is the most vigorous of my trees.
For my birthday I was taken to Bonsai West to pick out a new tree. I choose a Tropical Cherry tree that was in a nursery pot. However, it was mostly prepared to enter a bonsai pot so I also purchase a greenish pot. I attended another Get Wired session and potted the Cherry, which has already taken to its new habitat and is growing rapidly.
All of my trees are now outside to take advantage of the long days and warm weather. While today marks the longest day, it will remain warm for many months to come and my trees have plenty more time to grow. I have staged each of the trees in an area that gets morning sun for a week and then moved them to full sun. The last of this staging should happen this afternoon.
Origami
I'm currently working on a secret project that represents the most complex origami model I have attempted so far. I have almost completed the base for the model, but I am extremely nervous about shaping it to the final model. Wish me luck! More to come on this after the secrecy is no longer necessary.
I've attempted a few smaller models from an exclusive CP standpoint. I've been able to fold one of the three models, but haven't tried shaping it yet. I took pictures during the folding of this model so I hope I can find them and upload them at some point. The other models I gave up on and instead, cut the model in half to simplify the paper management. I've had more luck with this method, but I haven't gone back to finish the complete base for either model.
Monday, June 21, 2010
Monday, May 3, 2010
Ficus - "Get Wired"
I finally made it to one of Bonsai West's "Get Wired" seminars. The basics are: show up unannounced, pay $20, do anything you want to your bonsai with the help of an expert.
I knew going into it that this would be a good experience even if I could only use their tools. They had all sorts of shears, knob cutters, and other spherical, concave cutters. They also had tubs of soil and about 6 different gauges of wire. To top this off, the staff checked in with me to ask about my goals for the day and offer some advice.
I brought both of my trees because I wasn't sure what I wanted to do. I talked about how the plum went through a difficult time (my failure to water it adequately) and lost a lot of its inner foliage. The suggestion was to prune the outter leaves religiously until the tree produces buds lower on the branches. Upon looking at my fig tree, wiring immediately came up. It was exciting because he suggested pulling the branches apart just like I had started doing. However, he explained that using string or rope doesn't always do the trick because the entire branch bends and then flexes back. Wiring on the other hand allows you to bend a specific location of the branch that will eventually become permanent.
He began by demonstrating how to wire a tree. Start by planning how you will wire the bonsai. Obviously you should have some idea of how you want to shape your tree or you wouldn't be wiring it. We talked about my goal of making a dome type canopy with a crescent moon shape when looking from the top. Since my bonsai is currently rounded, this required wiring out branches to open up the inside of the tree. He used one piece of wire to wrap around two branches.
The instruction for wiring is as follows:
1) Always plan out where your wiring is going to go.
2) Make sure the wire is anchored well.
3) Angle the wire at about 45 degrees for maximum strength.
4) Don't use the branch to bend the wire. Bend it first and then position it on the limb.
5) Only bend the wire, do not bend the branch.
My wiring job wasn't perfect. There were many points where the wire was too loose around the branch. The spacing of my coils also varied a bit, especially toward the end of a limb. Overall, practice makes perfect and this was my first attempt.
I also learned that I've been pruning incorrectly. In the past, I would prune to the final location that I desired. Unfortunately, this does not take into account that there will be some dying back. The proper way to prune is to make a rough cut away from the final location. As this severed limb dies, the branch will swell by the previous joint. Make the final cut above the swelling for best results. There are several examples of exposed dead wood on my fig tree that was caused by my faulty pruning. This technique works for all size branches. We cut the apex (top-most point on the tree) of my fig to make it look better, but the final cut and healing will have to wait.
Finally, I discussed my attempts at Yamadori (bonsai from the wild). I told him about the shrub I excavated from the front of my house. He told me that this is the perfect time of year and that leaving it in a big pot was a good move. I can apply some pruning to shape if desired, but it should remain in the large pot for at least one year before heavy root pruning. I also mentioned my desire to convert my parent's over sized Daphne into a bonsai. This shrub would be perfect due to its large trunk size and Jin/Shari (deadwood that remains part of the bonsai). Unfortunately, I couldn't remember the species while I was at Bonsai West, so more to come on this.
Pictures coming soon.
Thanks for reading.
Monday, April 12, 2010
Bonsai - Spring Time
It is officially spring! Both of my trees are flourishing with new growth and everything outside is blooming and budding.
I'm glad that I pruned my Ficus as it is now growing faster than ever. Without the maintenance work I put in, I think my tree would be putting energy into areas I don't want developed. Not to mention that it would be completely out of control by now. Anyway, it is back to about how full the foliage was before my pruning and in only a month!
My plum is also growing rapidly. While I lost a lot of time and a fair amount of leaves to my watering issue, this tree has recovered nicely. I have to revisit my plum tree in a month or so to make sure it is growing the way I want it to, but for now, I'm just excited that it is happy.
I've also added a new tree to my collection. While I am not sure exactly of the species, I harvested a tree from the landscaping in front of my house. One of the shrubs had reseeded nearby and a sturdy 1 to 2 foot tree was coming up between another bush. I took some time last weekend to dig up the tree and pot it in a large garden pot. This type of tree has not started budding yet, so I'm hoping that it will begin this years growth in the pot. With some luck, I will be able to prune it for the first time late this year and repot it next spring.
As for the short term, I need to return to Bonsai West for some inspiration and maybe a new tree. They're having a sale this weekend as well as a Get Wired session, but I am unsure if I'll be able to make it. Ideally, I would like to add a Chinese Elm or a Japanese Maple to my collection. I'd also like to ask about next steps on both my fig and the shrub I recently dug up.
Thursday, April 1, 2010
CPs - The Crane
It is time to talk about CPs in more depth. Again, I don't proclaim to be any sort of expert. This is simply a record of my thoughts, which, in a perfect world, will help some poor soul that is in a similar situation as myself. That is of course, a beginner CP folder searching the web for help. All of this assumes that I will actually improve over time as well. However, the light at the end of the tunnel is that I've read in many places that the only way to learn CPs is to fold them, fail, fold them again, and eventually you'll have folded so many that you begin to understand what's going on.
I'm going to start by studying the CP of the basic origami crane. Because I know how to fold this model, I've started to notice certain things about the CP because I know the order in which the folds take place.
The first thing I notice is the full length diagonal valley fold. This fold goes from the tip of the head to the end of the tail. While this fold crosses the entire square of paper, it is important to realize that the model is smaller than the diagonal length of the paper. In fact, the head and the tail are fairly close to each other. Regardless, this is the first fold to make in the CP as well as the diagrams.
When I say the first fold in the diagrams, I am refereing to the bird base. Go back and click on the bird base CP from Origami - The Basics and you will see a red valley fold from corner to corner.
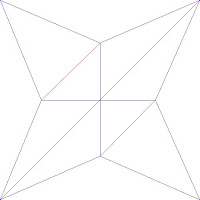
The next folds to complete the crane are less obvious. If you recognize the bird base shape (a 4 pointed star with a cross connecting the inner section), then you would know to fold that base first. Note that there are always other creases that make the bird base collapsable, but these creases varry based on the model. Let's say that don't recognize the bird base. How do you have any idea which inner creases to fold first?
The trick is to look for main creases. What I mean by this is look for creases that form mirror lines. On the bird base CP, look at creases that divide the paper in half (the CP shows that they don't go all the way across the paper). If we imagine these folds as mirrors, then the points of the star are mirrored on either side. This suggests that the half folds are important creases.
Conversely, detail creases can be identified by looking for a fold line that bends across a mirror line. These detail creases occur later in the folding sequence than the main creases.
Let's start by considering just the bird base CP. We already have decided the first fold should be the main crease from corner to corner (red valley fold). This makes sense as it is the largest mirror line in the model. The points of the star (blue mountain folds) are formed by an angle bisecting fold of the main crease line. However, the inside points of the star are mirrored by the half folds on the sheet (blue mountain folds). These folds should therefore be completed at the same time. This also makes sense as we do not know the size of either fold without the other. The final creases are the short folds that run parallel to the main mirror line (red valley folds). This is the completed bird base.
This same logic can be applied to the origami crane model. We know to start with the corner to corner fold. If we look through the CP for other mirror lines, the 4 point star and the half folds are the only creases that don't bend over some other mirror line. If you can't see that the folds parallel to the main crease need to be folded next, think about what you need to do to make this model collapse flat. This brings us to the bird base.
If you are having trouble following me at this point, I suggest printing out the CP of the origami crane. Draw all of the folds on each side with blue or black lines for mountain folds and red lines for valley folds. This will help you see the progress we make with each fold as valleys will line up with other valleys and mountains with other mountains. This is because of the mirror lines I keep talking about. I have included a hand drawn CP of the crane, which will hopefully work for now.
In a way, the bird base is the finished CP of the origami crane. Many CP models are finished by folding the base and then completing a series of shaping folds to achieve the final product. In our case, the shaping folds have been included on the CP because they are simple.
To begin shaping, we must narrow down which folds we can make before others. An example of this is the head in the bottom right hand corner of the CP above. This section cannot be completed until all of the folds, or mirror lines, that pass through it are done first. We know this because the head is the last step in the diagrams. However, the zig-zag image of the head on the CP shows it mirrored across each crease. Simiarly, the almost rounded areas in the top left and bottom right are mirrored across some creases we have not completed yet.
Here is a picture of the CP with the creases we have folded already shown in black. From this picture, we can see the next steps in the model. You don't? Okay, look at all of the black lines and imagine them as mirrors. We know they're mirrors because that's why we folded them first. Do you see that each black line has colored lines on either side of it that match up? The next step is to fold anything that was lined up in the last step. Basically, we're narrowing the neck and tail of the crane as in the diagrams (you can fold these flaps of the bird base in either direction, you will get a crane with slightly longer wings one way and a crane with more interesting wings if you follow my CP exactly).
At this point, you can probably see the crane coming together. All that's left is to fold up the head and tail, fold down the wings, and inside reverse fold the head. Look up an inside reverse fold if you don't know what it is. I've included the CP with the remaining steps below.
 I hope that you could follow this insane explanation of the origami crane. The crane is a simple model and I'm sure you can fold it, but the point is that you learned how the folds on a CP come together. Now I have to work on another model so that I can teach you.
I'm going to start by studying the CP of the basic origami crane. Because I know how to fold this model, I've started to notice certain things about the CP because I know the order in which the folds take place.
The first thing I notice is the full length diagonal valley fold. This fold goes from the tip of the head to the end of the tail. While this fold crosses the entire square of paper, it is important to realize that the model is smaller than the diagonal length of the paper. In fact, the head and the tail are fairly close to each other. Regardless, this is the first fold to make in the CP as well as the diagrams.
When I say the first fold in the diagrams, I am refereing to the bird base. Go back and click on the bird base CP from Origami - The Basics and you will see a red valley fold from corner to corner.
The next folds to complete the crane are less obvious. If you recognize the bird base shape (a 4 pointed star with a cross connecting the inner section), then you would know to fold that base first. Note that there are always other creases that make the bird base collapsable, but these creases varry based on the model. Let's say that don't recognize the bird base. How do you have any idea which inner creases to fold first?
The trick is to look for main creases. What I mean by this is look for creases that form mirror lines. On the bird base CP, look at creases that divide the paper in half (the CP shows that they don't go all the way across the paper). If we imagine these folds as mirrors, then the points of the star are mirrored on either side. This suggests that the half folds are important creases.
Conversely, detail creases can be identified by looking for a fold line that bends across a mirror line. These detail creases occur later in the folding sequence than the main creases.
Let's start by considering just the bird base CP. We already have decided the first fold should be the main crease from corner to corner (red valley fold). This makes sense as it is the largest mirror line in the model. The points of the star (blue mountain folds) are formed by an angle bisecting fold of the main crease line. However, the inside points of the star are mirrored by the half folds on the sheet (blue mountain folds). These folds should therefore be completed at the same time. This also makes sense as we do not know the size of either fold without the other. The final creases are the short folds that run parallel to the main mirror line (red valley folds). This is the completed bird base.
This same logic can be applied to the origami crane model. We know to start with the corner to corner fold. If we look through the CP for other mirror lines, the 4 point star and the half folds are the only creases that don't bend over some other mirror line. If you can't see that the folds parallel to the main crease need to be folded next, think about what you need to do to make this model collapse flat. This brings us to the bird base.
If you are having trouble following me at this point, I suggest printing
 out the CP of the origami crane. Draw all of the folds on each side with blue or black lines for mountain folds and red lines for valley folds. This will help you see the progress we make with each fold as valleys will line up with other valleys and mountains with other mountains. This is because of the mirror lines I keep talking about. I have included a hand drawn CP of the crane, which will hopefully work for now.
In a way, the bird base is the finished CP of the origami crane. Many CP models are finished by folding the base and then completing a series of shaping folds to achieve the final product. In our case, the shaping folds have been included on the CP because they are simple.
To begin shaping, we must narrow down which folds we can make before others. An example of this is the head in the bottom right hand corner of the CP above. This section cannot be completed until all of the folds, or mirror lines, that pass through it are done first. We know this because the head is the last step in the diagrams. However, the zig-zag image of the head on the CP shows it mirrored across each crease. Simiarly, the almost rounded areas in the top left and bottom right are mirrored across some creases we have not completed yet.
Here is a picture of the CP with the creases we have folded already shown in black. From this picture, we can see the next steps in the model. You don't? Okay, look at all of the black lines and imagine them as mirrors.
 We know they're mirrors because that's why we folded them first. Do you see that each black line has colored lines on either side of it that match up? The next step is to fold anything that was lined up in the last step. Basically, we're narrowing the neck and tail of the crane as in the diagrams (you can fold these flaps of the bird base in either direction, you will get a crane with slightly longer wings one way and a crane with more interesting wings if you follow my CP exactly).
At this point, you can probably see the crane coming together. All that's left is to fold up the head and tail, fold down the wings, and inside reverse fold the head. Look up an inside reverse fold if you don't know what it is. I've included the CP with the remaining steps below.
 I hope that you could follow this insane explanation of the origami crane. The crane is a simple model and I'm sure you can fold it, but the point is that you learned how the folds on a CP come together. Now I have to work on another model so that I can teach you.
Wednesday, March 3, 2010
Ficus - The First Pruning of Spring
I know what you're thinking: it isn't Spring yet. However, you are mistaken.
Spring does not have to due with the temperature outside, it has to due with the length of the days. As the sun gets higher and higher in the sky each day, we experience more hours of sunlight. This in turn makes all of the plants around us wake up from their winter slumber. The cold plays a big role in damaging any foolish plants that wake too early.
Since my room is a comfortable 60 degrees Fahrenheit (you can thank my mom for that choice of temperature, but it does indeed save on the heating bill), my ficus tree has continued growing through the winter. This is not only because it's warm. In fact, if I were to keep a pine or maple in my window, they would probably die. My oriental fig tree does not have this problem because it is a tropical tree.
I was told a tropical tree is a good starter bonsai for several reasons. First off, I got my ficus in the winter and who wants to start taking care of a tree that is currently in hibernation. Secondly, because it is tropical, I can keep it indoors all year round. This means I will have something to look at and enjoy throughout the year. It also means I don't have to find a cold space to store it during the winter months when cold hardy trees need to freeze. Finally, ficus is a fairly resilient species. It has a relatively large leaf size which, while not so large as to make the tiny tree look stupid, makes it more forgiving in terms of lighting and watering.
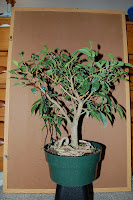
Enough rambling, here are some pictures of my tree as it stands since the last time I trimmed back some of its shoots.


The left picture is taken from the front while the right is a top view. Below is a left side and right side view respectively.


As you can see, my bonsai is very happy in my southerly window. The tree has significantly grown despite the winter months and is in clear need of a hair cut.

Post-cut photos in the same ordering as above.


It may not be as obvious in the photos, but I put a lot of work into this pruning. My main goal, with spring and summer months approaching rapidly, was to thin out the foliage so that sunlight will penetrate into the depths of the tree. This will create opportunities for tiny branches to mature and also produce a smaller leaf size.
I also tied a branch on the left hand side to a loop shaped root. This new position will become permanent in a few weeks and will help me achieve my desired shape. Note that the string is not wrapped directly around the branch as it might cut in. It is instead placed over a rubber ear piece from a cell-phone accessory. My hope is to create a half-moon curve when viewing the tree from the front with an oval canopy when viewing from above. We'll see if Bonsai West agrees when I take it in for a "Get Wired" session.
Near future decisions include:
Spring does not have to due with the temperature outside, it has to due with the length of the days. As the sun gets higher and higher in the sky each day, we experience more hours of sunlight. This in turn makes all of the plants around us wake up from their winter slumber. The cold plays a big role in damaging any foolish plants that wake too early.
Since my room is a comfortable 60 degrees Fahrenheit (you can thank my mom for that choice of temperature, but it does indeed save on the heating bill), my ficus tree has continued growing through the winter. This is not only because it's warm. In fact, if I were to keep a pine or maple in my window, they would probably die. My oriental fig tree does not have this problem because it is a tropical tree.
I was told a tropical tree is a good starter bonsai for several reasons. First off, I got my ficus in the winter and who wants to start taking care of a tree that is currently in hibernation. Secondly, because it is tropical, I can keep it indoors all year round. This means I will have something to look at and enjoy throughout the year. It also means I don't have to find a cold space to store it during the winter months when cold hardy trees need to freeze. Finally, ficus is a fairly resilient species. It has a relatively large leaf size which, while not so large as to make the tiny tree look stupid, makes it more forgiving in terms of lighting and watering.
Enough rambling, here are some pictures of my tree as it stands since the last time I trimmed back some of its shoots.


The left picture is taken from the front while the right is a top view. Below is a left side and right side view respectively.

As you can see, my bonsai is very happy in my southerly window. The tree has significantly grown despite the winter months and is in clear need of a hair cut.


Post-cut photos in the same ordering as above.


It may not be as obvious in the photos, but I put a lot of work into this pruning. My main goal, with spring and summer months approaching rapidly, was to thin out the foliage so that sunlight will penetrate into the depths of the tree. This will create opportunities for tiny branches to mature and also produce a smaller leaf size.
I also tied a branch on the left hand side to a loop shaped root. This new position will become permanent in a few weeks and will help me achieve my desired shape. Note that the string is not wrapped directly around the branch as it might cut in. It is instead placed over a rubber ear piece from a cell-phone accessory. My hope is to create a half-moon curve when viewing the tree from the front with an oval canopy when viewing from above. We'll see if Bonsai West agrees when I take it in for a "Get Wired" session.
Near future decisions include:
- Do I repot my tree into a bonsai pot this spring?
- Should I wire the tree into the desired shape?
- How do I fix the trunk near the apex? (it bends forward - big no, no in bonsai)
Thanks for reading.
Monday, March 1, 2010
Natal Plum - Bad News
My plum tree isn't looking so good. It held up for a while, but some of the leaves started turning red several weeks ago. At first I thought it might be due to the abuse it received when I first acquired it. I certainly haven't ruled out the intense pruning or the roots and branches, repotting of the tree into a bonsai pot, and changing its surroundings. However, I think I may have a clue as to the problem.
Watering may be the most difficult part of owning a bonsai. While my fig tree needs watering about once per week, my natal plum tree requires more frequent watering. Several factors including the airy soil and pot shape affect this. Unfortunately, I have been rather absorbed in skiing and other weekend activities and my two bonsai have been watered at about the same frequency. This is probably the main reason that my plant isn't doing so hot.
I am now keeping track of my plum bonsai more carefully. It seems to be needing water every 3 or 4 days. I only hope that I am not too late as many of the leaves that turned have fallen off. With any luck, more leaf changing will cease and my tree will return to its normal health.
Friday, February 5, 2010
Origami - The Basics
It is important to remember that origami is simply about folding paper. There are only two ways to fold paper: mountain folds and valley folds. These refer to the direction of the fold when keeping one side of the paper facing up. A mountain fold is created by folding the ends of the paper away from you so that a crease is formed pointing up at you, hence mountain. A valley fold is just the opposite, fold the ends of the paper upward so the crease is formed pointing away from you. These folds are the basis of all origami models.
The below two images are two ways of demonstrating the bird base. The left is a diagram showing the instructions in a specific order of folds. This method is easiest for beginners, but leaves extra creases on the final model. The right image is the crease pattern for the bird base. Don't believe me? Fold the model with the instructions on the top and then unfold it and look at where the main creases are. Crease patterns are used to save space and time when explaining a model. The challenge is getting the folds on a CP in the correct location and figuring out how to collapse it. More on this as I learn how to fold them.

The easiest origami models are diplayed in pictured diagrams. They are a step by step instruction on how to fold a model beginning with a square of paper. Each step shows the model in its current state and displays lines that indicate the required mountain and/or valley folds to complete the step. There are also various symbols that indicate basic folding techniques. These symbols are based on the Yoshizawa-Randlett system and should be  reviewed. I won't provide a link as I have learned this system from various places and a simple search will be adequate.
 reviewed. I won't provide a link as I have learned this system from various places and a simple search will be adequate.
Some origami models are based only on mountain and valley folds. What I mean by this is there is no order of folds or pictures of steps. These models are folded by crease patterns or CPs. A CP is a drawing of the folds required to finish the model. The picture to the right has both a crease pattern and a diagram of an origami crane. Most crease patterns are not this descriptive and only provide instructions for the base of the model.
A base is a stepping stone for any origami model. For some models like the crane, a base is a starting point to save time. An author might say, "Start with a bird base." This allows the model creator to focus on the specifics of their model instead of basic folding instructions. When folding a crease pattern, the base is an intermediate step that represents the completion of the CP. The base will not necessarily look like the final model, but it can be shaped into it. This allows for some creativity and personalization of the model.


Thursday, January 21, 2010
Natal Plum - An Intro to Bonsai Tree
Meet the newest member of my bonsai family! As I mentioned, I attended an Intro to Bonsai class at Bonsai West this past weekend and as part of the class, was given a new tree. The  new tree is a natal plum tree (Carissa Macrocarpa) and I'm very excited about it. This is not due to the fact that my new tree is particularly beautiful, but to the fact that I made it what it is.

 new tree is a natal plum tree (Carissa Macrocarpa) and I'm very excited about it. This is not due to the fact that my new tree is particularly beautiful, but to the fact that I made it what it is.
 The class started out with some basic instruction on bonsai care and culture. I had attended a free seminar the week before and gotten a lot of the information already, but I didn't mind some individual consideration. After some time, the instructor, Glen, told us to look at the plum trees and choose one that popped out at us. I was one of the first members of the class to reach the trees and was able to pick up each one and examine it. Based on my reading and instruction, I was looking for a tree that had a defined trunk line. I narrowed my selection down to two trees: one was a small, neat looking tree that stood about 6 inches tall with a trunk curving off to the right; the second was a disheveled, 8 or 9 inch tree that also curved to the right. I began looking through the branches of the two trying to see which might be a better choice. The first tree was clearly a good choice, but didn't seem like it needed much work. I eventually decided on the second tree because of the vigorous growth across the entire tree. While there were some leaves that had discoloration, I knew this was because of the dense packing of leaves.
After we had all sat down with our respective trees, the instructor walked over and chose the other tree I had held. I began to feel disappointed that I had made the wrong decision. He proceeded to tell us that he had already pruned this tree to where he wanted it. He showed us how to re-pot a bonsai plant using his model and told us to begin by thinning out the amount of leaves on our tree. I looked down at my messy cluster of branches and leaves totally disheartened. How would I ever make this tree into a bonsai plant I could be proud of?

I began by telling myself that since I didn't like my tree, it wouldn't matter if I attacked it in an attempt to reform it's appearance. While the instructor took a break, I tore off any leaves that were discolored or damaged. The goal here is to remove the weak leaves to give stronger leaves more access to sunlight. At this point, my pruning seemed futile as my tree looked more like a small bush than a bonsai. I stopped pruning leaves to examine the shape of my tree more closely. I realized that my trunk rose from the soil about 2 inches and then curved in a clockwise direction upwards. When the instructor returned, I asked if pruning back a significant portion of the branches and re-potting would kill my plant. I showed him the line I could see and he pointed out a few branches to remove that I was already imagining gone. I began to cut branches that didn't fit my style.
My tree forms a spiral with branches pointing outward. I removed any branch that came off the trunk straight upward or pointing toward the center of the spiral. This created a defined front of my tree. This is a location that a bonsai should always be viewed from. While it is important to examine the entire tree, all bonsai are displayed with a front and an apex (the top focal point of the tree). Upon asking my instructor, I began to trim back the remaining branches in order to maintain the proportions of height and girth. I also removed a few more leaves to balance the density of each branch.
 viewed from. While it is important to examine the entire tree, all bonsai are displayed with a front and an apex (the top focal point of the tree). Upon asking my instructor, I began to trim back the remaining branches in order to maintain the proportions of height and girth. I also removed a few more leaves to balance the density of each branch.
The next step is to re-pot the tree. We all chose a bonsai pot to go along with our starter tree. I selected a dark blue, almost purple pot to compliment the minds impression of a plum. To re-pot, I delicately removed my plum tree from its starter pot and raked away some of the soil around the roots. The goal is to expose some nebari or roots that can be seen and provide character to the tree. I then raked and trimmed away some of the extra roots on the bottom of the root ball. The goal here is to encourage radial growth, not depth. One thing that Bonsai West insisted on is a consistent soil mixture. They claim that being a bonsai master is about being in tune with your trees, but using different soil mixtures will make this impossibly difficult. Using their soil, I added some to my pot and pushed the anchoring wires through the root ball. I then twisted the wires, cut off the excess, and buried it into the soil. The final step is to add soil to the pot and compress it down, and compress it down more, and keep pressing to make sure there's no air around the roots. When this is completed, water the plant by dunking  and wait for the bubbles to stop.
 and wait for the bubbles to stop.
I lucked out with how my final presentation turned out. My tree is positioned off center, but the mass of the tree is evenly balanced across the pot. I also added a small rock that has a similar slope to the trunk. The rock duals as a decoration and a watering tool as it is time to water when the soil beneath it drys.
I'm very happy with my plum and I'm glad that I was able to get into the pruning and display some bravery. While I have a new bonsai model in my house that actually looks like a bonsai, I still have to go through the same process with my fig. However, that will have to wait for spring. My plum experienced spring a little earlier in the Bonsai West greenhouse.
Thanks for reading this novel of an entry.
Wednesday, January 20, 2010
Origami
Origami is the first Japanese hobby that captured my interest. While the art of folding paper may seem simple, it is a delicate and long process. This is made increasingly more difficult when attempting to document the process. I will attemt to divulge into some of what I have learned about origami in an attempt to help others who are trying out this ancient artform.
I'll start out with some background. Origami comes in many shapes and sizes, but these can all be separated into categories. True origami refers to a model that is folded from a square sheet with no cuts or adhesives. Models range from the basic origami crane to super complex models folded from a 6' by 6' sheet. True origami is a passion for me because of the artistic nature involved in making a square into something much more. Modular origami is a type that combines many sheets of paper to create geometric shapes and designs. This style interests me because it appeals to the engineer in me. It also happens to be some of the easiest to teach. Not all origami uses a square sheet. I will refer to anything that isn't true or modular origami as general origami. While most general models can be formed using a sheet that has a section folded behind, it is sometimes easier to use and display cut sheets. An example of this style is many flower models are made from irregularly shaped sheets. The weight of extra paper folded behind some of the petals would destroy the elegant image of the design.
I hope to use my blog to display and teach origami. I have already progressed significantly by reading forums and other websites on origami and I recommend doing the same. Otherwise, I hope you can enjoy the folding sequences that I've followed or maybe you'll just race forward to the final model. Either way, welcome.
Monday, January 18, 2010
Ficus Oriental - Trimmings
Last week I trimmed my bonsai tree. I decided that the growth on some of the shoots was getting a little out of control, so I cut any growth over a few inches. I left two or three leaves on each shoot to allow continued expansion of the branch. I also did some trimming of previous cuts. However, I learned that I don't have the correct tools.
I thought that basic trimming tools and maybe a good pair of scissors would be sufficient for my bonsai work. This was a bad assumption as there are specific tools for the art of bonsai. I learned that the scissors resemble two knife blades coming together as opposed to the blunt cutting edge of most scissors. There is also a specific tool that cuts a concave shape to make a trimming flush with the trunk. This shape also facilitates faster healing of the cut.
While I have made some progress, I need to acquire the correct tools or attend a "Get Wired" class at Bonsai West. I have plans to do this next month. In the short term, I have attended an "Intro to Bonsai" class and I will discuss my education and the newest addition to my collection soon.
Tuesday, January 5, 2010
Ficus Oriental - Continued Care
Ah, the new year. Now that the holidays are over, it's time to get back to Bonsai.
I acquired an instructive book for Christmas that I have been reading and it suggests making cuts to my tree during the off season. This is due to the fact that ficus trees are in a family of trees that make rubber and they ooze when cut or damaged. This has encouraged me to pursue some design help and begin formulating ideas for the future of my tree.
I stopped by Bonsai West on my way home from work not long ago and asked a few questions. I confirmed that watering the tree by submersion is the correct method. However, my watering frequency may be off. I have been watering the tree every 10 to 14 days or whenever the soil is dry. My soil testing method has been to bury my finger slightly into the soil and if I feel moisture, don't water. Apparently, my ficus tree probably wants water every 7 to 10 days which produces a dryness to the soil surface, but some moisture below. This new watering scheme has worked well and I believe there has been some growth (also the weeds seem to be very happy which is another good indicator). I also asked about trimming my tree.
The advice given was that since it is winter, trimming is fine, but only remove up to 10% of the foliage. This is fine seeing as I don't plan on going crazy, I just have some clean up work to do. My first task will be to trim previous trimmings closer to the trunk or branch. Since this tree was greenhouse grown, many of the cuts were hastily done and should be refined. Bonsai West confirmed this and warned of die back. This refers to a small length before the cut that dies to protect the rest of the tree. Leaving a small amount between the cut point and the nearest leaf is necessary so the leaf won't die as well. Good thing I asked!
I am hoping to make my first trimmings this week. Stay tuned for photos (if blogspot cooperates) of the endeavor.
Subscribe to:
Comments (Atom)
