Monday, April 18, 2011

Bonsai - A New Beginning

Hello all and welcome to Spring. The weather is finally warming up and I couldn't resist going to one of Bonsai West's classes. I decided to go to the Intro to Deciduous class now that I have some experience. While all of my previous trees are tropical and stay inside in the warmer climate during the winter, deciduous trees require cold weather to stay alive.

Early Spring is the perfect time to work on deciduous trees. This is largely because the trees still have no leaves at this time. Take a look at my brand new Chinese Elm. I thought this tree was pretty cool because it needed a lot of work, but had a great structure underneath. Since I've taken a few of these classes, I wasn't afraid of cutting away most of the scraggly branches to leave a solid foundation for my new tree. This type of heavy pruning shouldn't be a problem as most of the buds haven't formed yet. Here is the picture after all the hacking was complete. Believe me, I cut some heavy branches off of this tree. The photos do a good job of showing the tiny branch removal, but a few conflicting larger branches were removed as well.

You may notice that the last picture shows the Elm outside. This is because it needs to stay cold still. If the temperature is going to approach freezing, I will move it into the garage for the night, but it is important to keep deciduous trees cold for as long as possible. This way they can put forth a large surge of energy when it finally warms up enough. I can't let it freeze because that could kill many of the new buds and potentially the tree itself. In a month or so, when the temperature stabilizes above 50 degrees F, I will put my other trees out to join this one for the summer.

Tuesday, January 25, 2011

Bonsai - General Update

Wow, it's been a long time. However, I come prepared with pictures of all my trees. While the pictures are simple front views, it will at least provide a map of where each tree is.

Ficus

Here's my first tree in all its glory. You may or may not be able to see the left side of the tree separated from the rest of the tree because of the wiring. I plan on wiring it again late winter or early this spring to pull it apart more. The tree is happy as always and growing well this winter. However, it needs repotting as the soil is very compacted and the roots are beginning to come out the bottom of the pot.

Plum

The plum is doing excellent as well. You may notice that the leaves are colored again. I failed to learn from last year and did not adequately water this tree as the summer closed, turning to fall and winter. It didn't lose too many leaves though and you can see the progress of my spiral. Below is a top view to show off some of the color and the fruit this tree produced.


Cherry

My cherry tree had an unfortunate accident this summer and has recovered well. I went away for a few days and put my trees in bags to conserve moisture while they couldn't be watered. This is important because they were all taking water every day. The bag over the cherry fell a bit and contacted a large section of the leaves. As moisture condensed on the bag, it became a magnifying glass and cooked a large section of leaves. This section had to be cut out to promote new growth and is why one side is slanted. Hopefully, my spring pruning will defoliate enough of the tree to hide last years error. I also had a melee bug problem this summer on the cherry. This was treated with some pesticide and by spraying alcohol throughout the branches. Despite these problems, this tree has completely recovered and is one of my happiest and most rewarding bonsai.

Pine

This is one of two trees I got for Christmas. It is in a starter pot with mostly peat moss and I frankly don't know much about this tree yet. It seems happy though and I can see some new growth.

Flowering

This is the second new tree I have in my collection. I haven't researched this tree yet, but it had just finished blooming when I picked it up after the holidays. I'm very excited to add color to my room in winter with this tree and the styling is very interesting. This tree has been aggressively shaped and I look forward to adding my touch to it where necessary.

Monday, June 21, 2010

General Update

What can I say? It's the summer (officially starting today) and I've been busy with everything. Here is a general update on my hobbies.

Bonsai

I never got a chance to take pictures of the fig tree all wired up. It's too bad because it was my first wiring project and I think it turned out fairly well. As of last Thursday, I removed the wire from the ficus because it had started to cut in. To explain, the tree obviously is growing the whole time the wire is in place and if left too long, the tree will start to grow around the wire and leave ugly spiral grooves along the branches. Even with my current timing, it left some evidence, but only on the underside of 1 or 2 branches. Hopefully that will grow out quickly as I think the fig is the most vigorous of my trees.

For my birthday I was taken to Bonsai West to pick out a new tree. I choose a Tropical Cherry tree that was in a nursery pot. However, it was mostly prepared to enter a bonsai pot so I also purchase a greenish pot. I attended another Get Wired session and potted the Cherry, which has already taken to its new habitat and is growing rapidly.

All of my trees are now outside to take advantage of the long days and warm weather. While today marks the longest day, it will remain warm for many months to come and my trees have plenty more time to grow. I have staged each of the trees in an area that gets morning sun for a week and then moved them to full sun. The last of this staging should happen this afternoon.

Origami

I'm currently working on a secret project that represents the most complex origami model I have attempted so far. I have almost completed the base for the model, but I am extremely nervous about shaping it to the final model. Wish me luck! More to come on this after the secrecy is no longer necessary.

I've attempted a few smaller models from an exclusive CP standpoint. I've been able to fold one of the three models, but haven't tried shaping it yet. I took pictures during the folding of this model so I hope I can find them and upload them at some point. The other models I gave up on and instead, cut the model in half to simplify the paper management. I've had more luck with this method, but I haven't gone back to finish the complete base for either model.

Monday, May 3, 2010

Ficus - "Get Wired"

I finally made it to one of Bonsai West's "Get Wired" seminars. The basics are: show up unannounced, pay $20, do anything you want to your bonsai with the help of an expert.

I knew going into it that this would be a good experience even if I could only use their tools. They had all sorts of shears, knob cutters, and other spherical, concave cutters. They also had tubs of soil and about 6 different gauges of wire. To top this off, the staff checked in with me to ask about my goals for the day and offer some advice.

I brought both of my trees because I wasn't sure what I wanted to do. I talked about how the plum went through a difficult time (my failure to water it adequately) and lost a lot of its inner foliage. The suggestion was to prune the outter leaves religiously until the tree produces buds lower on the branches. Upon looking at my fig tree, wiring immediately came up. It was exciting because he suggested pulling the branches apart just like I had started doing. However, he explained that using string or rope doesn't always do the trick because the entire branch bends and then flexes back. Wiring on the other hand allows you to bend a specific location of the branch that will eventually become permanent.

He began by demonstrating how to wire a tree. Start by planning how you will wire the bonsai. Obviously you should have some idea of how you want to shape your tree or you wouldn't be wiring it. We talked about my goal of making a dome type canopy with a crescent moon shape when looking from the top. Since my bonsai is currently rounded, this required wiring out branches to open up the inside of the tree. He used one piece of wire to wrap around two branches.

The instruction for wiring is as follows:
1) Always plan out where your wiring is going to go.
2) Make sure the wire is anchored well.
3) Angle the wire at about 45 degrees for maximum strength.
4) Don't use the branch to bend the wire. Bend it first and then position it on the limb.
5) Only bend the wire, do not bend the branch.

My wiring job wasn't perfect. There were many points where the wire was too loose around the branch. The spacing of my coils also varied a bit, especially toward the end of a limb. Overall, practice makes perfect and this was my first attempt.

I also learned that I've been pruning incorrectly. In the past, I would prune to the final location that I desired. Unfortunately, this does not take into account that there will be some dying back. The proper way to prune is to make a rough cut away from the final location. As this severed limb dies, the branch will swell by the previous joint. Make the final cut above the swelling for best results. There are several examples of exposed dead wood on my fig tree that was caused by my faulty pruning. This technique works for all size branches. We cut the apex (top-most point on the tree) of my fig to make it look better, but the final cut and healing will have to wait.

Finally, I discussed my attempts at Yamadori (bonsai from the wild). I told him about the shrub I excavated from the front of my house. He told me that this is the perfect time of year and that leaving it in a big pot was a good move. I can apply some pruning to shape if desired, but it should remain in the large pot for at least one year before heavy root pruning. I also mentioned my desire to convert my parent's over sized Daphne into a bonsai. This shrub would be perfect due to its large trunk size and Jin/Shari (deadwood that remains part of the bonsai). Unfortunately, I couldn't remember the species while I was at Bonsai West, so more to come on this.

Pictures coming soon.

Thanks for reading.

Monday, April 12, 2010

Bonsai - Spring Time

It is officially spring! Both of my trees are flourishing with new growth and everything outside is blooming and budding.

I'm glad that I pruned my Ficus as it is now growing faster than ever. Without the maintenance work I put in, I think my tree would be putting energy into areas I don't want developed. Not to mention that it would be completely out of control by now. Anyway, it is back to about how full the foliage was before my pruning and in only a month!

My plum is also growing rapidly. While I lost a lot of time and a fair amount of leaves to my watering issue, this tree has recovered nicely. I have to revisit my plum tree in a month or so to make sure it is growing the way I want it to, but for now, I'm just excited that it is happy.

I've also added a new tree to my collection. While I am not sure exactly of the species, I harvested a tree from the landscaping in front of my house. One of the shrubs had reseeded nearby and a sturdy 1 to 2 foot tree was coming up between another bush. I took some time last weekend to dig up the tree and pot it in a large garden pot. This type of tree has not started budding yet, so I'm hoping that it will begin this years growth in the pot. With some luck, I will be able to prune it for the first time late this year and repot it next spring.

As for the short term, I need to return to Bonsai West for some inspiration and maybe a new tree. They're having a sale this weekend as well as a Get Wired session, but I am unsure if I'll be able to make it. Ideally, I would like to add a Chinese Elm or a Japanese Maple to my collection. I'd also like to ask about next steps on both my fig and the shrub I recently dug up.

Thursday, April 1, 2010

CPs - The Crane

It is time to talk about CPs in more depth. Again, I don't proclaim to be any sort of expert. This is simply a record of my thoughts, which, in a perfect world, will help some poor soul that is in a similar situation as myself. That is of course, a beginner CP folder searching the web for help. All of this assumes that I will actually improve over time as well. However, the light at the end of the tunnel is that I've read in many places that the only way to learn CPs is to fold them, fail, fold them again, and eventually you'll have folded so many that you begin to understand what's going on.

I'm going to start by studying the CP of the basic origami crane. Because I know how to fold this model, I've started to notice certain things about the CP because I know the order in which the folds take place.

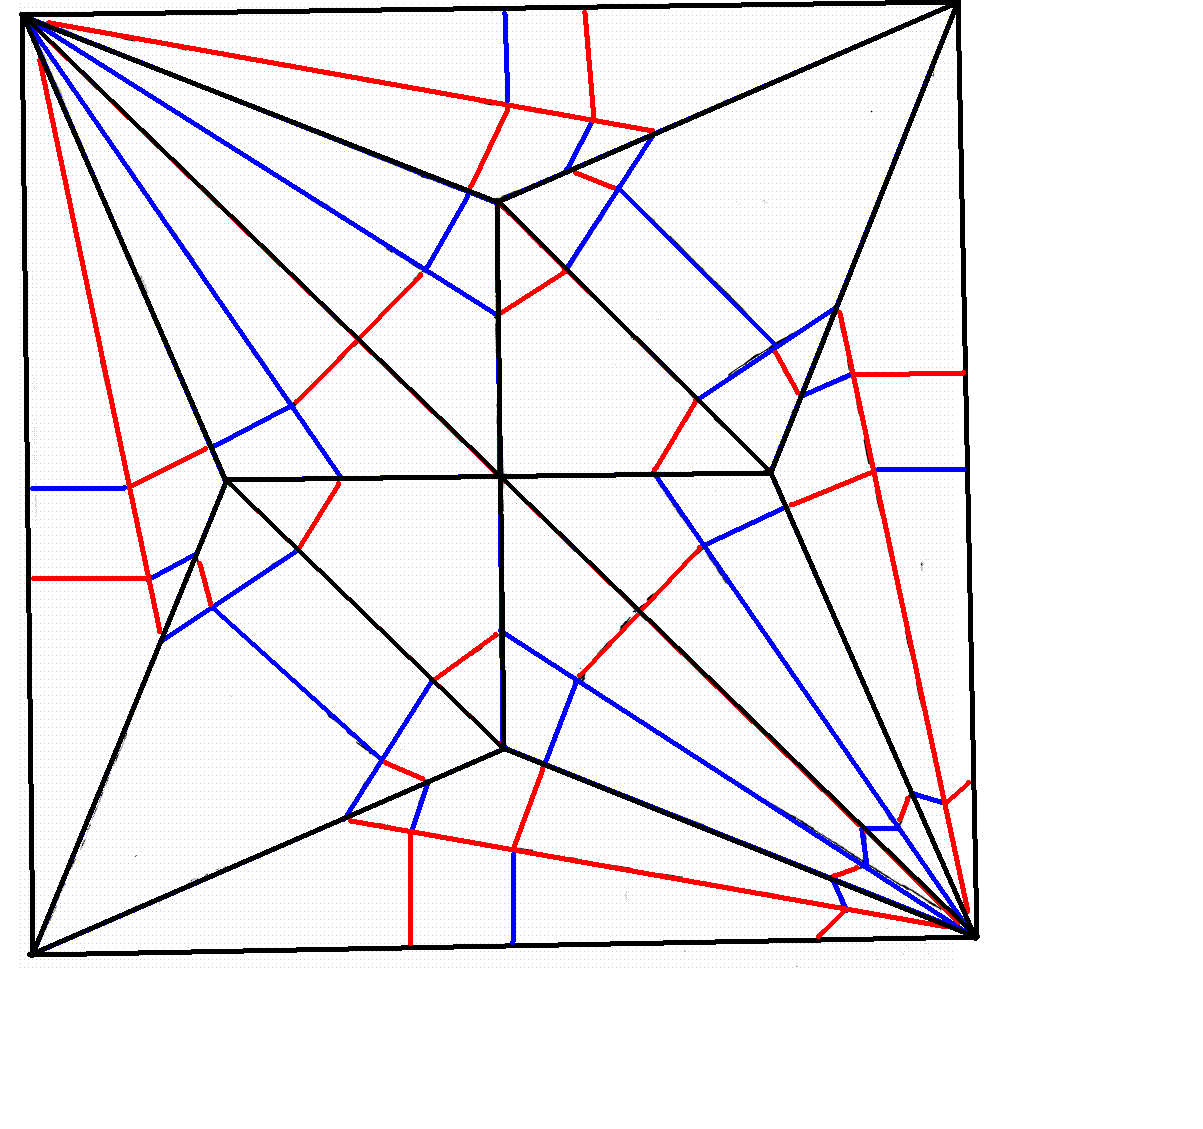
The first thing I notice is the full length diagonal valley fold. This fold goes from the tip of the head to the end of the tail. While this fold crosses the entire square of paper, it is important to realize that the model is smaller than the diagonal length of the paper. In fact, the head and the tail are fairly close to each other. Regardless, this is the first fold to make in the CP as well as the diagrams.

When I say the first fold in the diagrams, I am refereing to the bird base. Go back and click on the bird base CP from Origami - The Basics and you will see a red valley fold from corner to corner.

The next folds to complete the crane are less obvious. If you recognize the bird base shape (a 4 pointed star with a cross connecting the inner section), then you would know to fold that base first. Note that there are always other creases that make the bird base collapsable, but these creases varry based on the model. Let's say that don't recognize the bird base. How do you have any idea which inner creases to fold first?

The trick is to look for main creases. What I mean by this is look for creases that form mirror lines. On the bird base CP, look at creases that divide the paper in half (the CP shows that they don't go all the way across the paper). If we imagine these folds as mirrors, then the points of the star are mirrored on either side. This suggests that the half folds are important creases.

Conversely, detail creases can be identified by looking for a fold line that bends across a mirror line. These detail creases occur later in the folding sequence than the main creases.

Let's start by considering just the bird base CP. We already have decided the first fold should be the main crease from corner to corner (red valley fold). This makes sense as it is the largest mirror line in the model. The points of the star (blue mountain folds) are formed by an angle bisecting fold of the main crease line. However, the inside points of the star are mirrored by the half folds on the sheet (blue mountain folds). These folds should therefore be completed at the same time. This also makes sense as we do not know the size of either fold without the other. The final creases are the short folds that run parallel to the main mirror line (red valley folds). This is the completed bird base.

This same logic can be applied to the origami crane model. We know to start with the corner to corner fold. If we look through the CP for other mirror lines, the 4 point star and the half folds are the only creases that don't bend over some other mirror line. If you can't see that the folds parallel to the main crease need to be folded next, think about what you need to do to make this model collapse flat. This brings us to the bird base.

If you are having trouble following me at this point, I suggest printing out the CP of the origami crane. Draw all of the folds on each side with blue or black lines for mountain folds and red lines for valley folds. This will help you see the progress we make with each fold as valleys will line up with other valleys and mountains with other mountains. This is because of the mirror lines I keep talking about. I have included a hand drawn CP of the crane, which will hopefully work for now.

In a way, the bird base is the finished CP of the origami crane. Many CP models are finished by folding the base and then completing a series of shaping folds to achieve the final product. In our case, the shaping folds have been included on the CP because they are simple.

To begin shaping, we must narrow down which folds we can make before others. An example of this is the head in the bottom right hand corner of the CP above. This section cannot be completed until all of the folds, or mirror lines, that pass through it are done first. We know this because the head is the last step in the diagrams. However, the zig-zag image of the head on the CP shows it mirrored across each crease. Simiarly, the almost rounded areas in the top left and bottom right are mirrored across some creases we have not completed yet.

Here is a picture of the CP with the creases we have folded already shown in black. From this picture, we can see the next steps in the model. You don't? Okay, look at all of the black lines and imagine them as mirrors. We know they're mirrors because that's why we folded them first. Do you see that each black line has colored lines on either side of it that match up? The next step is to fold anything that was lined up in the last step. Basically, we're narrowing the neck and tail of the crane as in the diagrams (you can fold these flaps of the bird base in either direction, you will get a crane with slightly longer wings one way and a crane with more interesting wings if you follow my CP exactly).

At this point, you can probably see the crane coming together. All that's left is to fold up the head and tail, fold down the wings, and inside reverse fold the head. Look up an inside reverse fold if you don't know what it is. I've included the CP with the remaining steps below.

I hope that you could follow this insane explanation of the origami crane. The crane is a simple model and I'm sure you can fold it, but the point is that you learned how the folds on a CP come together. Now I have to work on another model so that I can teach you.

Wednesday, March 3, 2010

Ficus - The First Pruning of Spring

I know what you're thinking: it isn't Spring yet. However, you are mistaken.

Spring does not have to due with the temperature outside, it has to due with the length of the days. As the sun gets higher and higher in the sky each day, we experience more hours of sunlight. This in turn makes all of the plants around us wake up from their winter slumber. The cold plays a big role in damaging any foolish plants that wake too early.

Since my room is a comfortable 60 degrees Fahrenheit (you can thank my mom for that choice of temperature, but it does indeed save on the heating bill), my ficus tree has continued growing through the winter. This is not only because it's warm. In fact, if I were to keep a pine or maple in my window, they would probably die. My oriental fig tree does not have this problem because it is a tropical tree.

I was told a tropical tree is a good starter bonsai for several reasons. First off, I got my ficus in the winter and who wants to start taking care of a tree that is currently in hibernation. Secondly, because it is tropical, I can keep it indoors all year round. This means I will have something to look at and enjoy throughout the year. It also means I don't have to find a cold space to store it during the winter months when cold hardy trees need to freeze. Finally, ficus is a fairly resilient species. It has a relatively large leaf size which, while not so large as to make the tiny tree look stupid, makes it more forgiving in terms of lighting and watering.

Enough rambling, here are some pictures of my tree as it stands since the last time I trimmed back some of its shoots.


The left picture is taken from the front while the right is a top view. Below is a left side and right side view respectively.


As you can see, my bonsai is very happy in my southerly window. The tree has significantly grown despite the winter months and is in clear need of a hair cut.


Post-cut photos in the same ordering as above.


It may not be as obvious in the photos, but I put a lot of work into this pruning. My main goal, with spring and summer months approaching rapidly, was to thin out the foliage so that sunlight will penetrate into the depths of the tree. This will create opportunities for tiny branches to mature and also produce a smaller leaf size.

I also tied a branch on the left hand side to a loop shaped root. This new position will become permanent in a few weeks and will help me achieve my desired shape. Note that the string is not wrapped directly around the branch as it might cut in. It is instead placed over a rubber ear piece from a cell-phone accessory. My hope is to create a half-moon curve when viewing the tree from the front with an oval canopy when viewing from above. We'll see if Bonsai West agrees when I take it in for a "Get Wired" session.

Near future decisions include:
  1. Do I repot my tree into a bonsai pot this spring?
  2. Should I wire the tree into the desired shape?
  3. How do I fix the trunk near the apex? (it bends forward - big no, no in bonsai)

Thanks for reading.